


This tutorial will teach you how to create a design featuring a colorful explosion contrasting with grayscale elements. This design heavily relies on the creative use of brushes, patterns and Photoshop tools/effects.
Though this tutorial was created in Photoshop CS5, you should have no problems achieving the same effect in any CS version.
Step 1. Start off with a blank, nearly square canvas size. In this case, I’ve used 1200x1150.
Create a new layer and save this micro patterns set from ObsidianDawn. To use them, unpack the archive and double-click on the resulting .pat file; this will make them appear in your list of patterns in Photoshop. Then, go to Layer -> Layer Style -> Pattern Overlay… and use the following settings:

Lower the opacity of the layer to 62%. You should now have a grayscale polka dot pattern background:

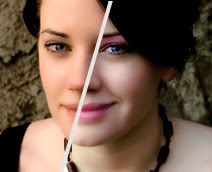
Step 2. Open this image separately and convert it to grayscale by going to Image -> Adjustment -> Color Mixer… and using the settings below:

Then add on top a Curves… adjustment layer, with the following RGB settings:

Step 3. The next step involves retouching the image, in order to eliminate unsightly noise and make it look smooth and professional. You might have your own method for doing this, which is fine. However, this is my way of doing a very quick retouch: duplicate the image, add a layer mask to the resulting layer and then, making sure you have the second layer selected (not its mask), go to Filter -> Noise -> Median… and type in a small value in the Radius box (in this case, 3).

After that, go to Filter -> Blur -> Gaussian Blur… and input the value 2 in the Radius box.

Fill the mask with solid black and, making sure the mask is selected, pick a 25px round, soft brush and start painting with white on the layer. Only paint over the skin area to give it a smooth effect, while avoiding the lines of the face and body.
To add a final touch, carefully select the lips with the Lasso Tool. Then paint once over them with a bright red brush. The effect might look daft now, but in the final composition, it will be an interesting detail.

Step 4. Next, flatten the image and paste it over the polka dot background. Position it in the center of the image and mask away its white background, until you get something like this:

Step 5. Add two subsequent Curves… adjustment layers, with the following settings:

You should get something similar to this:

Step 6. Save and load this smoke brush set from ObsidianDawn. Create a new layer, pick a smoke brush, the color white, and set the brush size around 200-300px. Paint on the layer by using the brush around the girl’s body in a C shape. You can then mask away the excess using various brushes from the set, to create a more pleasant effect.
Then, go to Layer -> Layer Style and add the following styles to the layer:
Drop Shadow

Inner Shadow

Outer Glow

Satin

After completing this step, the image should look similar to this:

Step 7. Download this sketches brush set, load it and paint two branches on two new layers, as shown below:

Step 8. On a new layer, create two spots with a medium, soft brush, in two different colors. Then set the blending mode to Lighten and duplicate the layer to intensify the effect.

Step 9. Create a new Hue/Saturation adjustment layer with the following settings:

Then, add a layer mask and with a large soft brush, mask away the central part of the image:

Step 10. Pick a light gray, medium and soft brush, and then, on a new layer, subtly paint a little over the parts of the image that appear solid black (around the hair, camera and dress). Next, lower the opacity of this layer, if you find it necessary; I’ve set it to 50%.

Step 11. Create a new layer and paint on it with a smoke brush, or any similar brush you can find, in a similar way to what I’ve done below:

Then, go to Filter -> Blur -> Motion Blur… and use the following settings:

Step 12. Create a new layer, choose a swirl brush from the sketches brush set and use it as below:

Next, go to Filter -> Blur -> Gaussian Blur… and input a value of 25:

Step 13. To create the stunning colorful explosion that truly makes this tutorial unique, on a new layer, paint again with a sketch brush of your choice as illustrated below:

Then, go to Filter -> Noise -> Median… and input a value of 5. After that, go to Filter -> Blur -> Gaussian Blur… and input a value of 15.
With a large soft brush, erase or mask away a lot of the resulting effect, until you end up with something like this:

Step 14. Duplicate the colorful explosion layer, turn it upside down and place it lower than the first one. Then, change its saturation to a yellowish hue, to obtain a similar effect to this:

Step 15. Create a new layer and use the flower brush from the sketches brush set, as shown below:

Go to Filter -> Noise -> Median… and input a value of 11. After that, go to Filter -> Blur -> Gaussian Blur… and input a value of 8.
After that, mask away most of this layer, leaving only the tips of the petals on the sides:

Step 16. Because the image is rather dull the way it is now, add a new Curves… adjustment layer:

Step 17. I’ve added the word ‘photography’ to match the theme of the design. The font is Windsong, size: 216, character spacing: -50. To achieve the text effect below I’ve simply overlaid two text layers of different colors.

Step 18. Create a new Levels… adjustment layer to brighten up the image a bit more:

Step 19. To add a stylish border, merge all the layers together and go to Image -> Canvas Size… and use the following settings:

Then go to to Image -> Canvas Size… again and use these settings:

The final result:

1 comments:
I have gone through the post top to bottom. I have found it very useful. I am going to share this link with my friends and colleagues. I think everybody should do so.
Thank you.
Post a Comment